Friday, March 30, 2012

Steampunk Diva


I created this layout using the gorgeous March kit from Scraps of Darkness titled Needful Things. The patterned papers are all  perfectly coordinated with the embellishments which makes creating stunning layouts like this one a breeze! the kit also includes a sketch by Suepup and a challenge is posted in the forum. Everyone on the talented design team provides us with their amazing interpretations of the sketch each month. This is my interpretation of this months sketch. I used a turquoise pearl mist on the background paper and inked the edges with black and colored the edges and the design on the inside corners by watering down some Royal Blue liquid pearls and brushing it on with a paint brush. The layered scalloped circles were made using the Tattered Doily Lucky 8 punch by We R Memory Keepers.
I cut the outside border of the blue paper I punched to allow the patterned paper underneath to show through. The brown flowers on the right side of the page were included in the kit, the black and orange flower are Prima Autumn Harvest collection.

The picture I used was actually an illustration I found while I was searching for Steampunk girls on Bing.com.
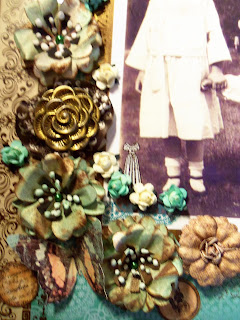
Here are some close up shots showing the details...


Hope you enjoyed the details I shared on this layout and thank you for visiting Scrapbook Nirvana!

Reflections of Mina


This is Mina...a dark, mysterious and enigmatic girl I met on Facebook. She has a plethora of amazing pictures and I asked her if I could scrap her pictures using the wonderful Scraps of Darkness kit for March 2012 ~ Needful Things. I was ready to try several techniques on this page and also use many different types of materials. First, I misted, inked and distressed a white piece of Bazzill white orange peel texture card stock. Once I misted it I crumpled it up and while I was straightening out the paper the lower right hand corner ripped and came off in my hand. So I distressed the torn edges and taped the back. I then intentionally ripped more parts of the paper and used the same technique there but they got lost in the layers.


Once I distressed the edges I used some black soot distress ink and ran that over the entire background paper. Once that dried I used my embossing ink pad and pressed it down on random parts around my page and then sprinkled spiced marmalade distress embossing powder on the entire area. After shaking off the excess and heating with the heat gun it looked like the picture above.


Here you can see the cheese cloth and the vine ribbon I layered behind the photo, the jewelry piece I got from a friend and is old and broken but goes perfect with the layout. The wings and skull are grunge board shapes that I inked with a bottle of broken china distress ink then with a black soot distress pad before covering them in copper embossing powder. I drizzled fabric glue on random places around the page then sprinkled some black and iridescent green seed beads on the finished page to bring out some texture. In this photo you can also see the stamped hot air balloon from Glitz. I used broken china ink on that too and also used clear embossing powder on that to make it stand out a bit more.


In the top left corner I used another Glitz corner stamp, using black embossing powder. The butterfly is clip art I found and printed up on photo paper. I inked the white background around it to make it blend in with the layout a bit better. The eye, the heart and the steam punk Mr. Potato head are all photos that I inked as well and found on the internet. I misted everything with a turquoise mist that I made with acrylic paint and pearl colored powder from perfect pearl's metallic collection. I misted everything on the layout with it except the photos and the grunge shapes. I'm very pleased with how this came out. Thanks for reading my blog! Happy Scrapping!

Monday, March 12, 2012

Featured Layout of the Month at Scraps of Darkness - February 2012


I was pleasantly surprised to see that my "Memories of Having Fun" layout was chosen as Layout of the Month for the Scraps of Darkness February 2012 Victoriana kit! I loved using my old family photos with this kit and all of the papers were versatile and wonderfully coordinated with a multitude of embellishments! This was my first Scraps of Darkness kit and I hold it responsible for my new found creativity and evolved style! I would like to thank all of the design team, moderators and my fellow members over at Scraps of Darkness for a multitude of things; tutorials, praise, advice and for bestowing me with this wonderful honor! You have also given me some bragging rights to add to my resume and aid me in my endeavor of  making it onto a design team! I am forever grateful!

The proof is on the  Scraps of Darkness Blog . Thank you for visiting me and happy scrapping!

Thursday, March 8, 2012

Marion and Robert-Seneca Park, Rochester, NY-Scraps of Darkness

This is my maternal grandmother and great uncle Marion and Robert Foster, I know this picture was taken in 1920 or maybe 1921. I used the wonderful Scraps of Darkness Victoriana Kit for this layout. I just adore the colors and embellishments of this kit. It is very versatile!
The photo mat is made from the Martha Steward Around the Page Deco fan punch. The photo measures 5x7 inches and with the border it fits perfectly in the 6.75x8.5 inch punched matte.
I used some plain brown cheap card stock to punch the matte and it was a much lighter brown than the rest of my page so I dyed the edges with vintage photo distress dye, then I used Perfect Pearls medium on it and covered the edges in gold metallic, then used a paper towel to brush some of it off. I also used gold Perfect Pearls on the metal flower that came in the Scraps of Darkness kit that is to the left of the picture. I sanded the raised edges first with an emery board and then added the perfect medium before dusting it with the gold powder.

If you love the look of distressed edges or want to achieve that vintage look, check out Craftysprinkles Easy Water Distressing Technique this is a close up of my water distressed edges. Thank you Mandy!
The big flowers I made in this picture I learned from Reneabouquets Astrid Flower Tutorial! The possibilities are endless with this flower! Thank you so much Renea!
Once my flowers are put together and dried I like to take my extra long tweezers and curl the edges of the flower under...these tweezers are also a great tool when you're using your heat gun on anything, especially something small. I don't know where to get them, I found these when I moved in my house. I choose to mist, crumple, dry and then ink my flowers. You can either follow the tutorial or do what works for you. Instead of the white tulip fabric paint I used liquid applique for the starburst punch you can find that here. Liquid Applique-Scrapbooking Warehouse
I hope you liked my newest layout! Be Sure to check out all of the tutorials I linked to they are super easy and fun! Also, come on over to Scraps of Darkness/Scraps of Elegance  if you're interested in the fabulous papers and embellishments you have seen here today! They also have more tips and tutorials! Thanks for visiting my blog! Sincerely, Amanda